The $200 Backing Tracks Rig

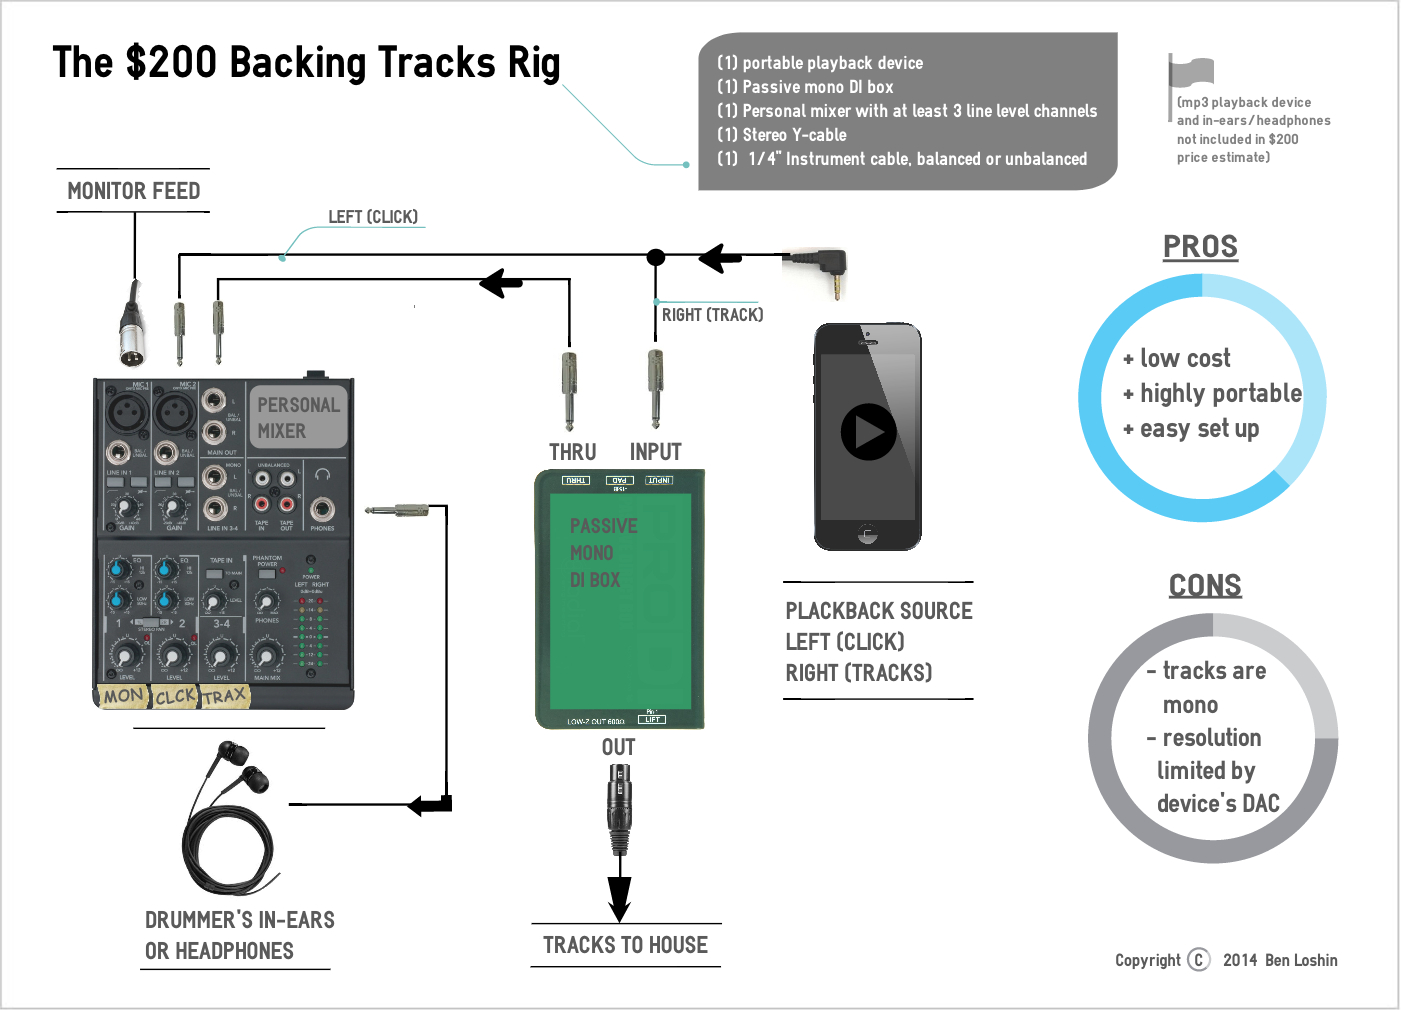
This is probably the simplest way to run backing tracks at any gig with a minimal amount of equipment.  Although an iPhone is pictured, you can use any device capable of playing any digital stereo music file.  I’ve used this setup everywhere, from small clubs, to live performances on national TV.  Although it’s not ideal for bigger venues with stereo PA systems, it works great in a pinch when you have to deal with budget, setup time, or equipment size limitations.

If you’re new to this world of backing tracks, you can check out this article for a quick overview: Backing Tracks Rigs – An Introduction


Playback: Mono, limited by device’s built-in digital-to-analog converter

Audio Fidelity: depends on the file type (mp3, wav, AIFF, etc.)

Ease of Setup: *****

Portability: *****

Reliability: ***

Ease of Editing: *


Equipment

  • (1) iOS or other device with a headphone jack capable of stereo audio playback (not included in price estimate)
  • (1) DI box
  • (1) Personal mixer with at least 3 mono line level channels
  • (1) Stereo Y-cable or splitter cable
  • (1) ¼” cable, balanced or unbalanced
  • (1) Headphone extender (optional)

Configuration

  1. Prepare your backing tracks so that the Left side of the stereo mix is just click track/cues and the Right side is just backing track. In other words, when you bounce down your backing track to mp3, put everything you don’t want the audience to hear on the Left side and everything you do want the audience to hear on the Right side.
  2. Plug Y-cable into 1/8” headphone jack on your iPhone, iPod, iPad, or other device capable of mp3 playback.
  3. Plug the (Right) ¼” end of Y-cable into DI box input jack.
  4. Plug the (Left) ¼” end of Y-cable into a channel on your mixer. Label this channel “Click” on your mixer
  5. Run the ¼” balanced or unbalanced cable from the “thru port” on your DI box to a second channel on your mixer. Label this channel “Trax” on your mixer.
  6. Introduce yourself to the sound guy/gal or monitor engineer and politely ask for a feed to plug into a third channel on your mixer labeled “Mon”.   Make him/her aware of your mono DI for Front of House playback.
  7. Connect your in-ear monitors or headphones to the headphone jack on your mixer using the optional headphone extender.

Tips

  • If you’re using a smart phone for playback, unless you want the crowd to hear that phone call from your mom, make sure you turn off the “phone” functions during your performance. On an iPhone this is accomplished by putting your phone in Airplane Mode.
  • If you’re using an iOS device, your iTunes app will automatically advance to the next song in your playlist. I recommend using a backing tracks app such as BackTraxTM by Aisle Pro Software or LiveTrax ProTM by Monakrome. These apps will stop playback at the end of each track and automatically cue up the next track. They also include very large buttons for playing, stopping, and advancing through your setlist.
  • Leave your device plugged into a power supply so you don’t have to rely on your device’s battery life.
The iOS Interface Backing Tracks Rig

What if you love the idea of running your backing tracks from your iPhone, iPod Touch or iPad, but you need your tracks to play in stereo and sound really good? The headphone jack on your iOS device can be a great option in a pinch, but it only puts out 1 stereo track (or 2 mono tracks if you utilize a splitter). You need an external soundcard, also called a digital-to-audio converter (DAC) or external audio interface. In the past few years lots of companies have introduced audio interfaces for the iOS device to the market. Many of them have 2 outputs, and that’s fine if you want to run mono backing tracks. However, if you need to send a stereo backing track to the house AND a click track to yourself, that puts you at 3 output tracks.

My favorite iOS interface at the moment is the Native Instruments Traktor Audio 2. I love the Traktor because it’s super compact (fits in the palm of your hand) and super affordable ($100 retail). Though it’s geared toward the DJ market, the Traktor does have two independent 1/8” TRS outputs, for an output track count of 4. One limitation to the Traktor is that it has no audio input preamps or analog-to-digital conversion. In other words, you can’t record with it; strictly playback, but for running backing tracks, that’s all we need in order to get the job done. If you want to purchase something you can also use for recording, the Apogee Duet is a great option.

You’ll also need an iOS app that allows you to assign your stereo mix and click to separate outputs. ShowOne by One Zero One Audio is a fantastic app designed specifically for playback of mono or stereo backing tracks and click/cue tracks through separate outputs. At only $8.99 for the full version it also comes with a bunch of really handy features like automatic click track syncing, voice countoffs, and setlist management.


Audio Fidelity: ****

Ease of Setup: ****

Portability: *****

Reliability: ****

Ease of Editing: app dependent


Ingredients

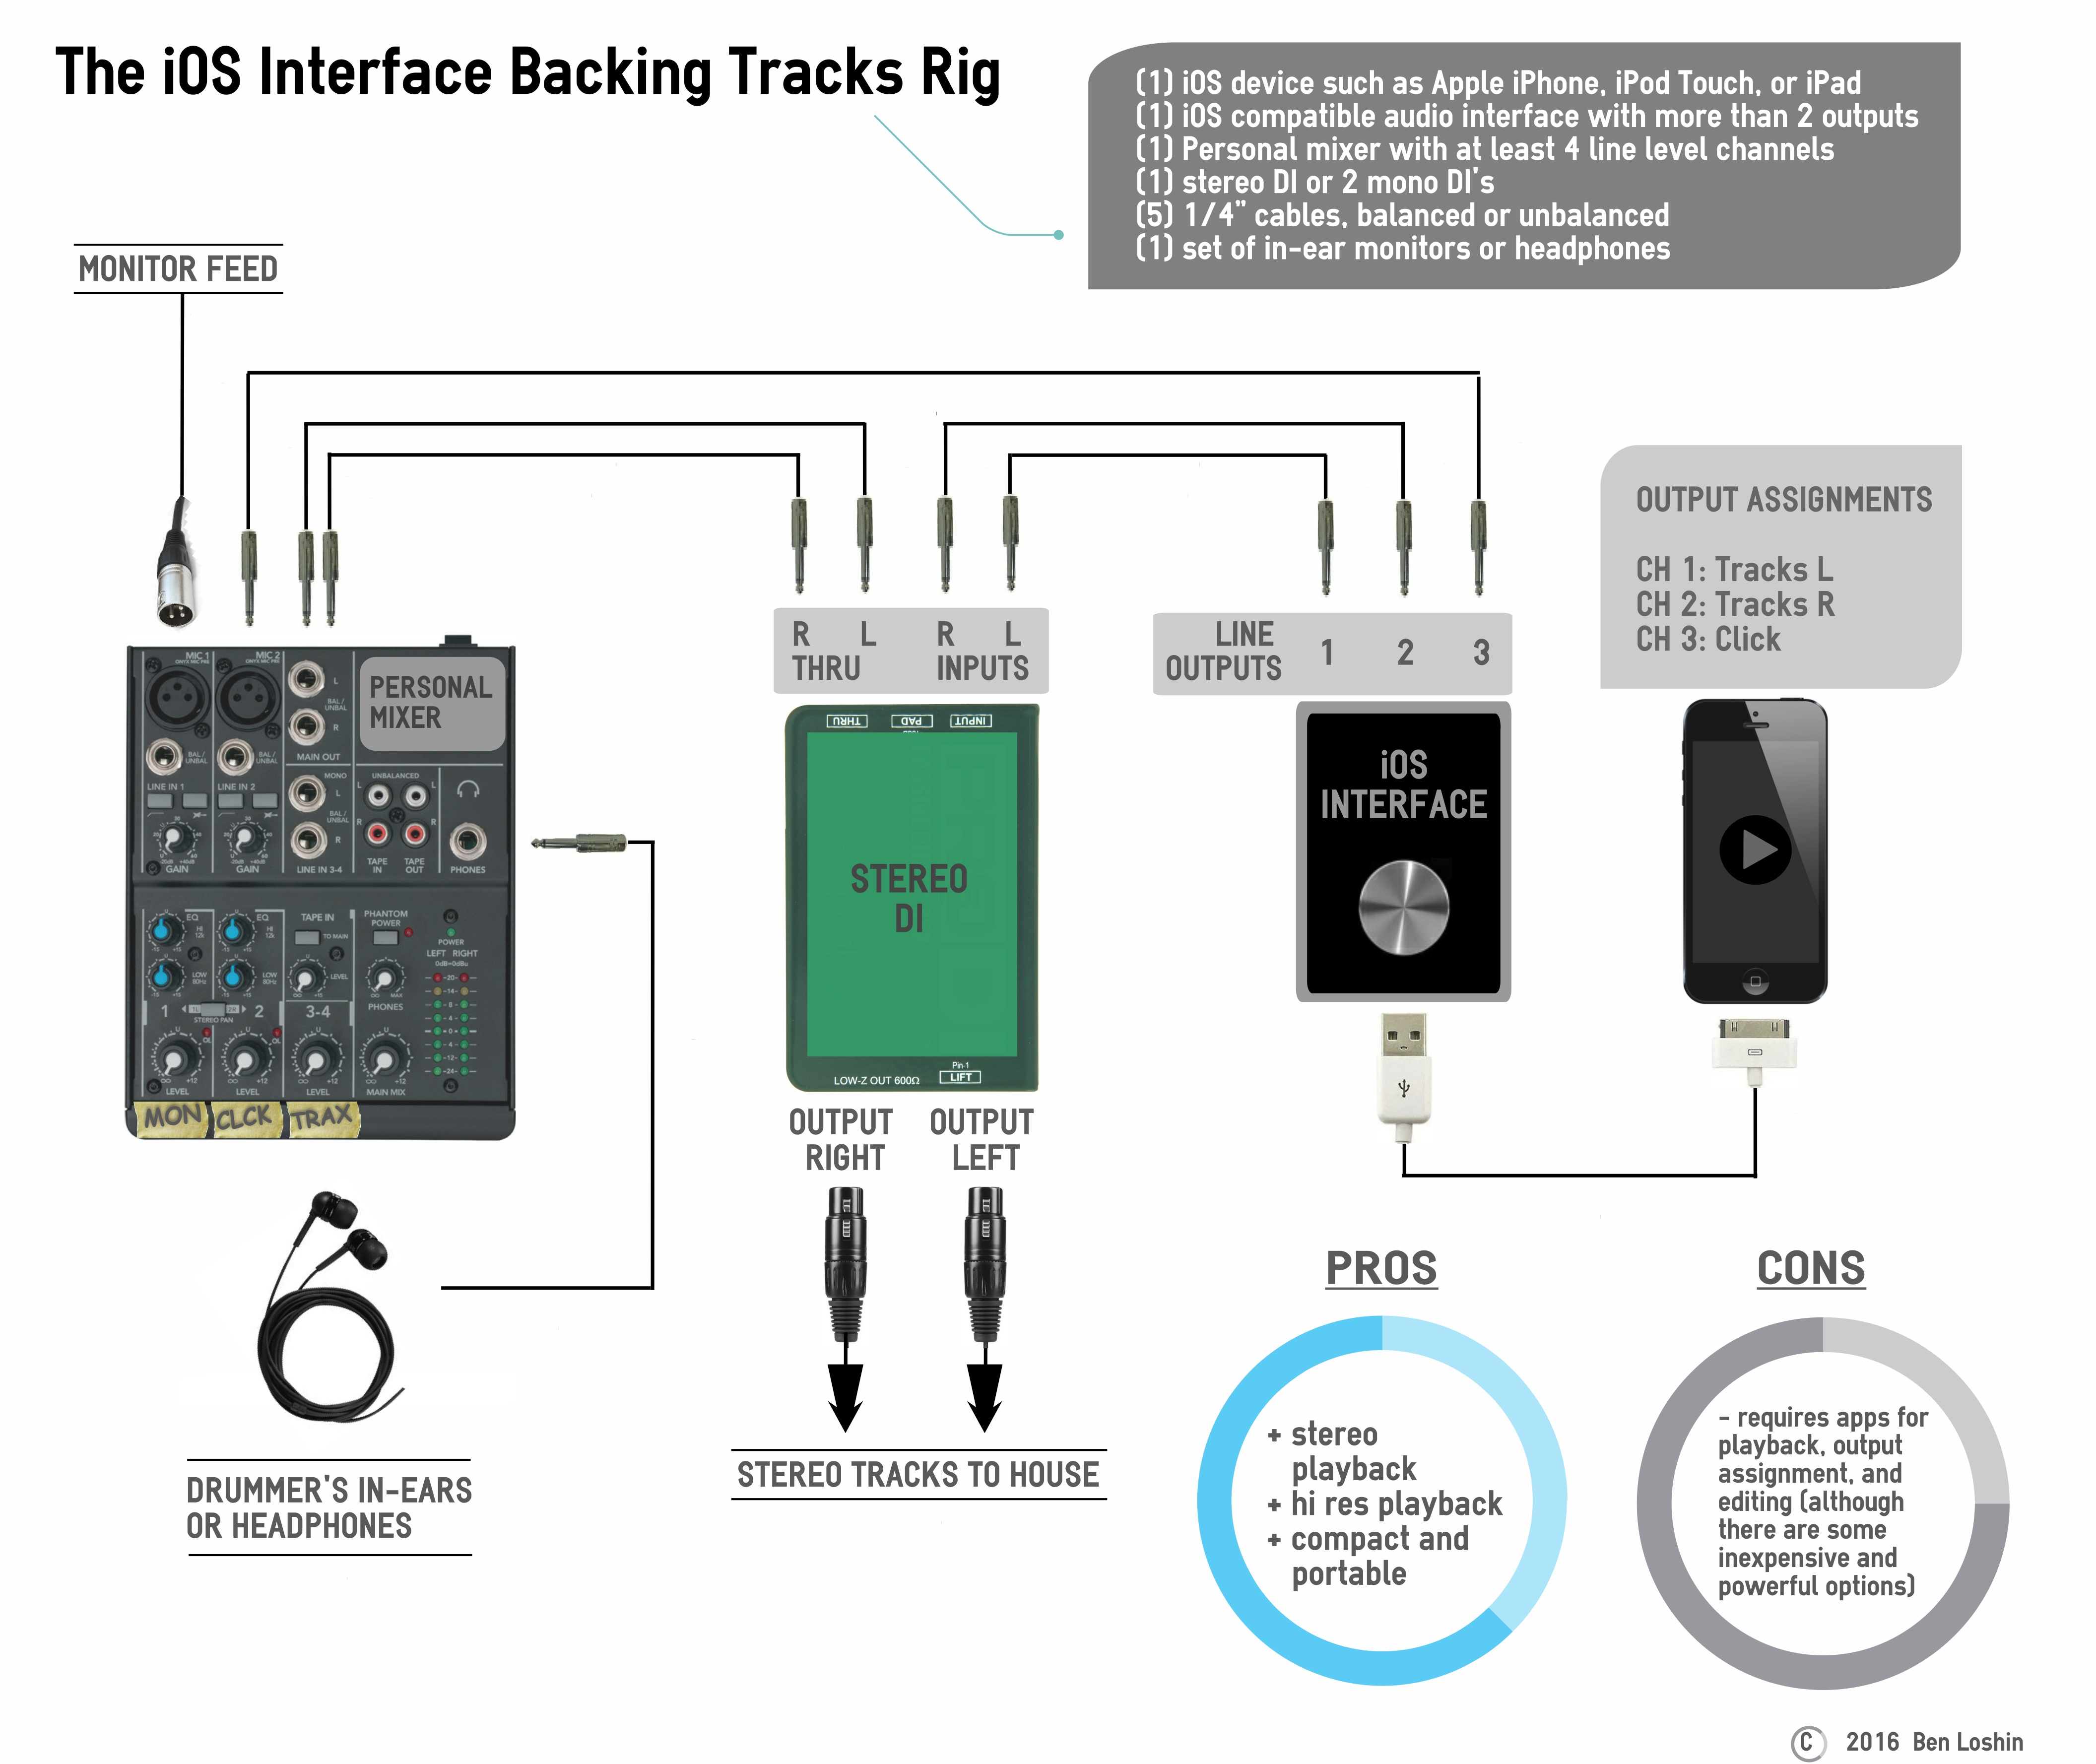
  • (1) iOS device such as Apple iPhone, iPod Touch, or iPad
  • (1) iOS compatible audio interface with more than 2 outputs
  • (1) Personal mixer with at least 4 line level channels
  • (1) stereo DI or (2) mono DI’s
  • (5) 1/4” cables, balanced or unbalanced
  • (1) set of in-ear monitors or headphones


Prep

  1. Prepare your backing tracks within your playback app so that you have a stereo mix and a click track routed to individual outputs. Use outputs 1 and 2 for the left and right sides of your stereo backing track and output 3 for click.
  2. Connect your iOS device to your interface. Some interfaces may require adapters from Apple 30-pin to Apple Lightning.
  3. Run a ¼” balanced or unbalanced cable from Output Channel 1 on your interface to the input jack on the stereo DI box labeled “Left”.
  4. Run a ¼” balanced or unbalanced cable from Output Channel 2 to the input jack on the DI box labeled “Right”.
  5. Run a ¼” balanced or unbalanced cable from the left thru port on your stereo DI to the left side of a stereo channel on your mixer labeled “Tracks”.
  6. Run a ¼” balanced or unbalanced cable from the right thru port on your stereo DI to the right side of a stereo channel on your mixer labeled “Tracks”.
  7. Run the ¼” balanced or unbalanced cable from Output Channel 3 on your interface to a channel on your mixer labeled “Click”.
  8. Introduce yourself to the sound guy/gal or monitor engineer and politely ask for a feed to plug into the channel on your mixer labeled “Mon”. Make him/her aware of your DI’s for stereo front-of-house playback.
  9. Connect your in-ear monitors or headphones to the headphone jack on your mixer.


Tips

  • Put your device in airplane mode when using it for playback.
  • If your interface uses TRS outputs to combine pairs of output channels (the Traktor Audio 2 does this), use a stereo “Y” cable to split these channels instead of the two ¼” cables in steps 3 and 4 above.
  • Some interfaces are bus powered, meaning they use your iOS device as a power source, and they will thus drain your iOS device’s battery very quickly.  So make sure you use an external DC power supply to power your interface.

The Hard Disk Backing Tracks Rig

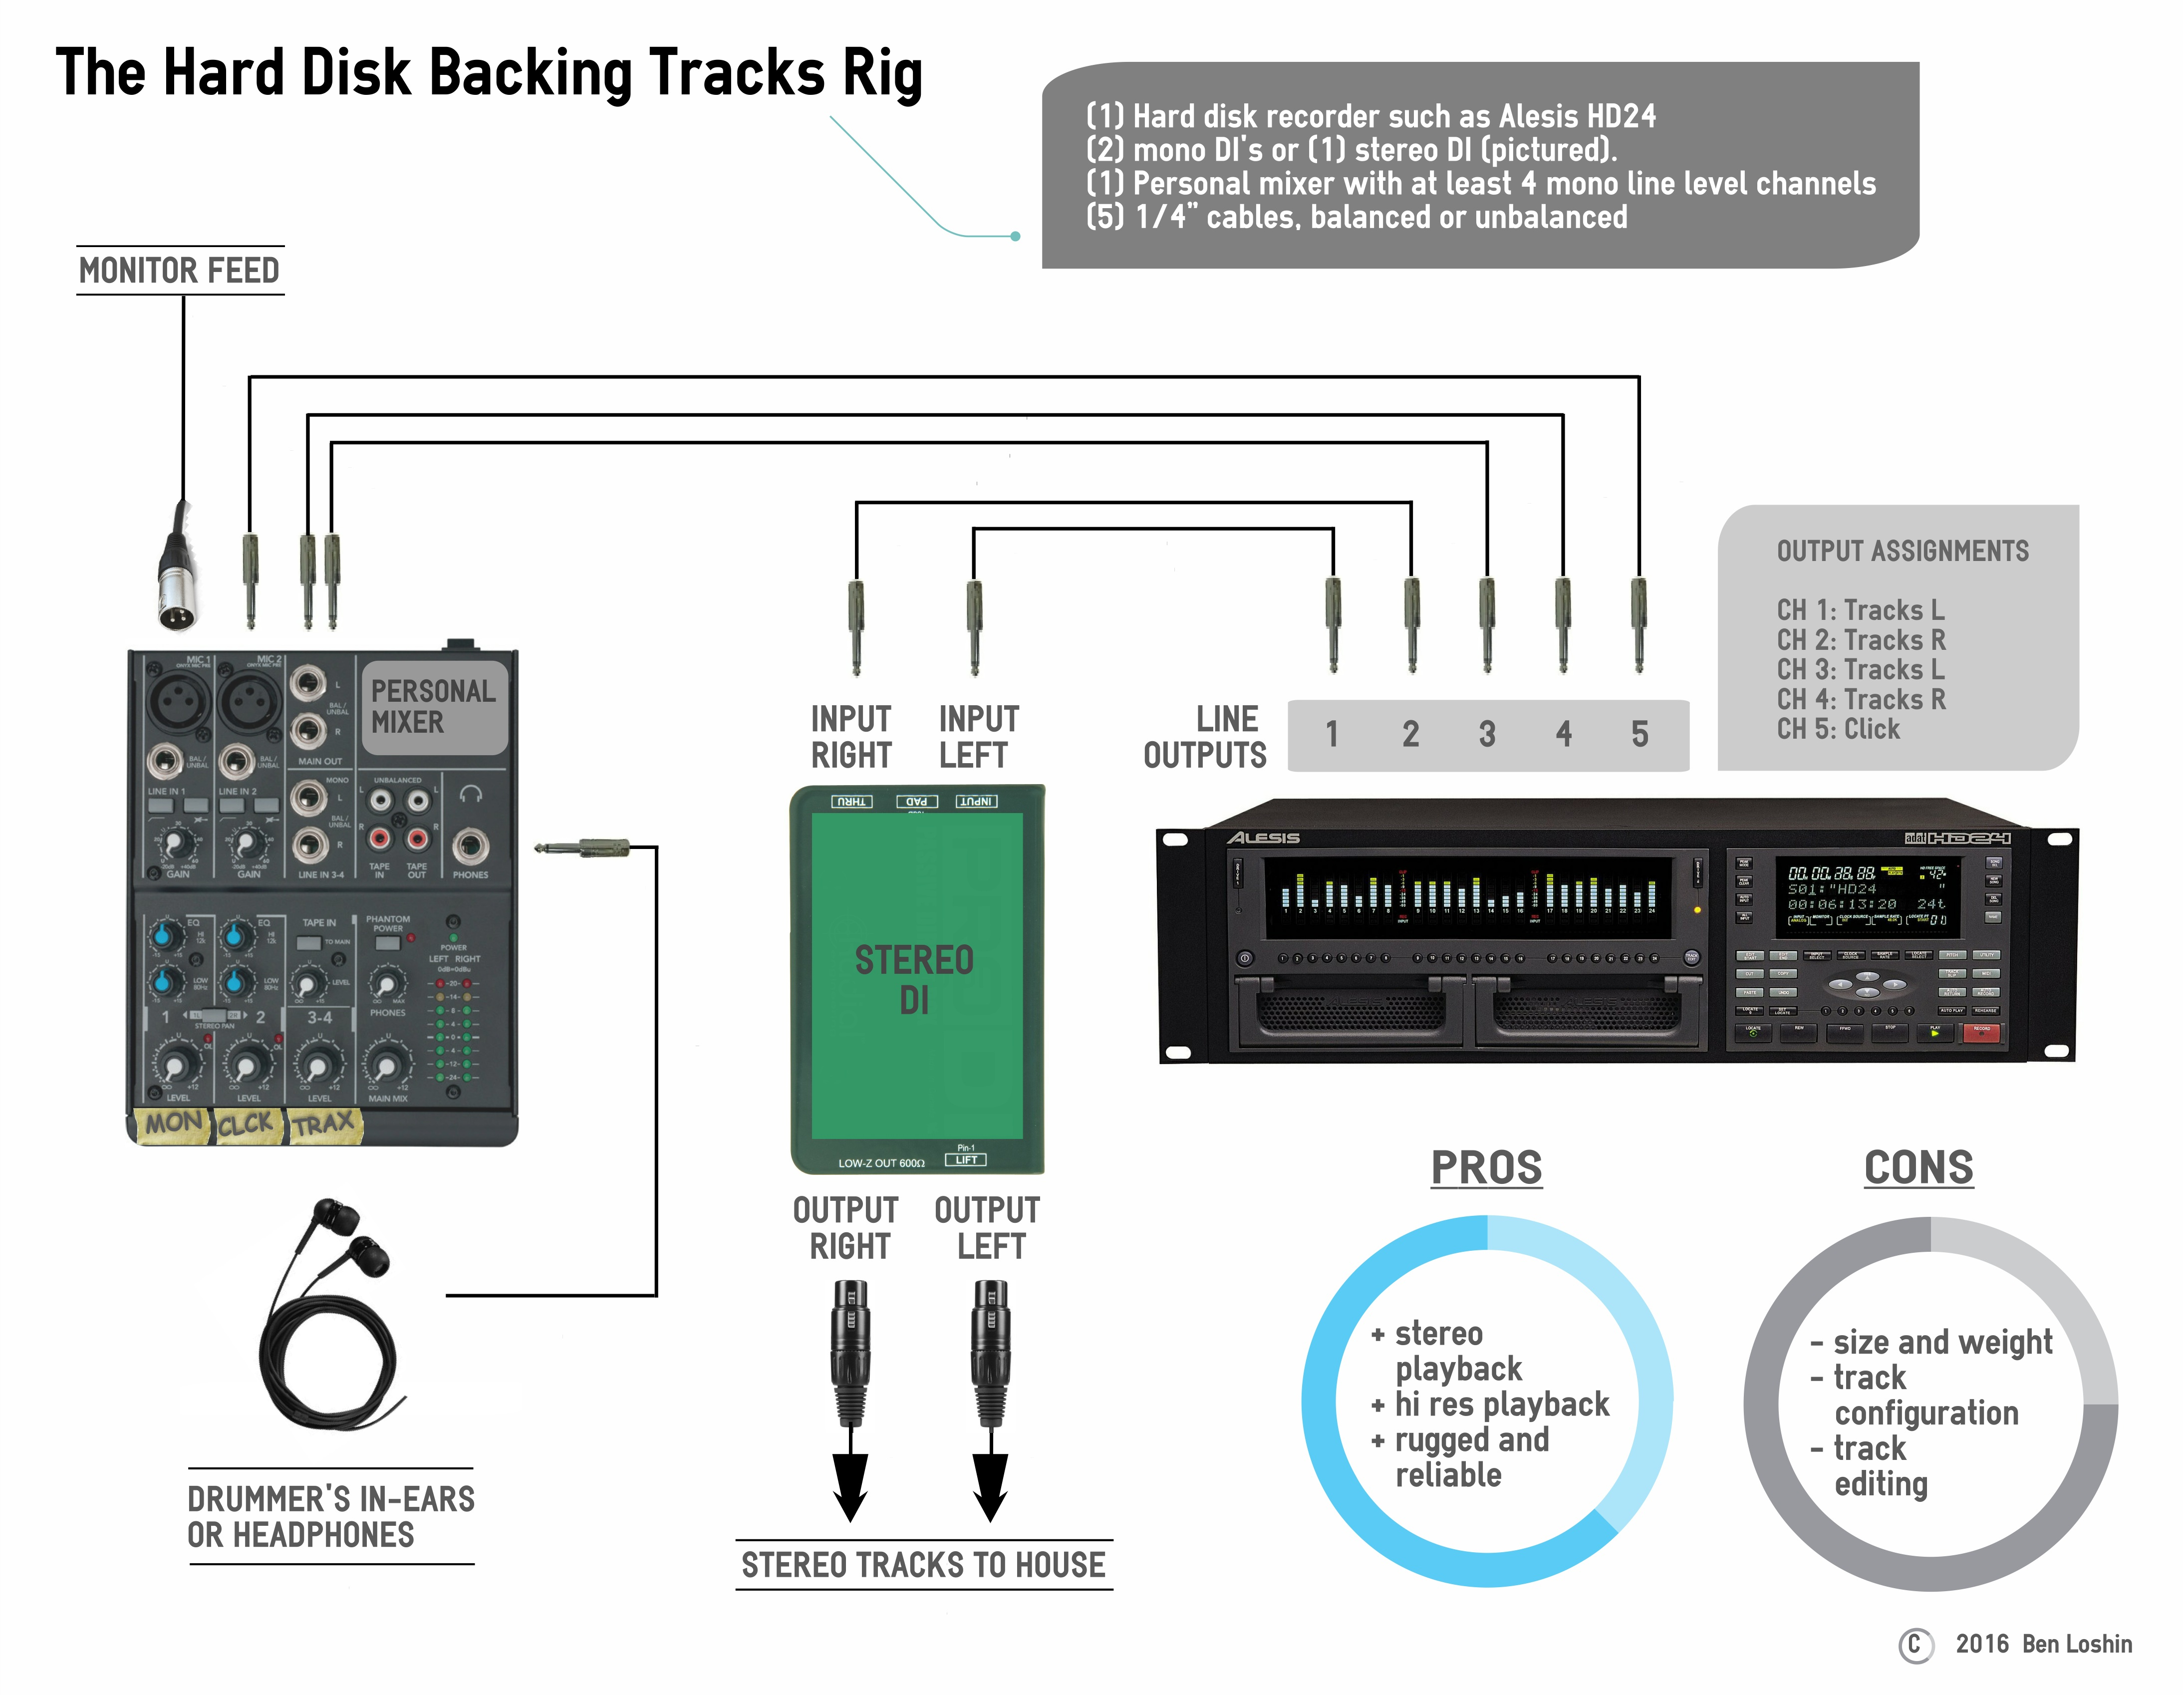
This rig is based around a hard disk recorder like the Alesis HD24 (pictured). With this setup, you have the stereo playback resolution and output options of a computer/high track count audio interface, but without some of the hassles that come with laptop based systems.  However, you have the added step of importing your audio files from your computer into the HD recorder.  You will also need to set up markers in order to indicate the start points of each song.  Although editing and even changing setlist order can be a little cumbersome, the reliability and roadworthyness of a rackmount hardware unit can offer valuable piece-of-mind.

I suggest looking for a used hard disk recorder. Why used? This is 1990’s technology. If you can find one of these new, it will cost over $1,000 and you’re better off with one of the other options at that price point in my opinion.

If you’re new to this world of backing tracks, you can check out this article for a quick overview: Backing Tracks Rigs – An Introduction


Playback: Up to 23 channels (plus click) 24bit 48 kHZ

Audio Fidelity: *****

Ease of Setup: **

Portability: **

Reliability: *****

Ease of Editing: *


Ingredients

  • (1) Hard disk recorder such as Alesis HD24 (pictured).
  • (2) DI boxes or (1) stereo DI (your own). Label them “Left” and “Right”
  • (1) Personal mixer with at least 4 mono line level channels
  • (5) ¼” cables, balanced or unbalanced
  • (1) Headphone extender


Prep

  1. Prepare your backing tracks in your DAW so that you have a stereo mix and a click track.
  2. Import your tracks into the HD24 such that the first two output channels are your stereo backing track, left and right respectively, the third and fourth channels are duplicate outputs of your stereo backing track, and the fifth channel is your click/cue track. You can use the additional output channels if you are sending multiple stems to the house.
  3. Run a ¼” balanced or unbalanced cable from Output Channel 1 to the input jack on the DI box labeled “Left”
  4. Run a ¼” balanced or unbalanced cable from Output Channel 2 to the input jack on the DI box labeled “Right”
  5. Run a ¼” balanced or unbalanced cable from Output Channel 3 to a channel on your mixer labeled “Tracks L”
  6. Run a ¼” balanced or unbalanced cable from Output Channel 4 to a channel on your mixer labeled “Tracks R”
  7. Run the ¼” balanced or unbalanced cable from Output Channel 5 to a channel on your mixer labeled “Click”.
  8. Introduce yourself to the sound guy/gal or monitor engineer and politely ask for a feed to plug into the channel on your mixer labeled “Mon”. Make him/her aware of your DI’s for stereo front-of-house playback.
  9. Connect your in-ear monitors or headphones to the headphone jack on your mixer.


Tips

  • The high output track count on the HD24 and units like it make it possible to create an extra left and right output for your backing tracks that you can use to send to yourself for independent control of the track level in your own in-ears.  This will allow you to ride the level of the tracks in your mix without affecting the level going to the house.
  • If anyone else in the band needs to hear click/cues, you can use one of the available outputs to duplicate that track and send it to that player or to the monitor engineer.
  • The HD24 is a 3-space rackmountable unit. You can house it in a soft rack case such as the Gator GRB 4U, with the mixer and DI’s on top. To decrease setup time, bundle the three cables that connect the HD24 to your mixer using cable ties, and bundle the two cables that connect the HD24 to your DI’s. Label the ends of each cable.
  • To be extra slick, you can get a rackmountable mixer, a rackmountable DI, and a rackmountable power supply, and house everything in one rack. This option could work for van and bus tours and church installations, but will likely be too big and heavy to fly.

Backing Tracks 101

From my experience, and in talking to drummer friends, it seems drummers are taking on more and more responsibility in terms of running the show.  Traditionally, this has involved cueing count-offs/endings,  communicating dynamics, and defining the tempo.  But now, with an increasing number of acts using prerecorded material, another opportunity has been created for the tech savvy drummer – managing the playback of backing tracks.

In case you’re new to the world of backing tracks, just think them as pieces of pre-recorded audio running in the background of a performance.  This can be anything from a few background vocals, to string arrangements, to entire finished album mixes that the performers mime to.  (Yes, I’ve done a few of those gigs.)   A click track is used in order to keep the live performances in sync with the pre-recorded content.  Syncing of the show also makes automated lighting and video cues possible.

The hardware for live playback can be stationed on stage and run by a band member or offstage with a tech. At the club level, it’s pretty common for it to be part of a keyboard player or drummer’s rig because we tend to be stationary.  In the case of bigger acts, the playback rig might live offstage and be run by a dedicated tech.

Becoming familiar with the many options for live playback hardware is another way to set yourself apart in the marketplace of drummers looking for gigs. You’ll be ready to take on the additional responsibility of setting up, running, and editing a vital part of the show; you’ll be able to speak the production language used by professionals; and you’ll be better suited to move into more of a musical director’s role if that’s your thing. If you’re part of band, you can use this information to add production value to your band’s live show in the way that’s most practical for you.

Note: The decision to use backing tracks is a matter of taste that can be very genre-specific and artist-specific. Perhaps the decision to use or not to use backing tracks will be the topic of a future article here at The Drummer’s Mouth.

As the technology keeps changing I’ll be using this as an archive for different configurations at different price points. There will be graphics explaining the setup, a rating system with 5 categories, and links to shopping lists.  Be sure to check back here often or subscribe to the newsletter for the latest updates on backing tracks rigs.

 The $200 Backing Tracks Rig