The iOS Interface Backing Tracks Rig

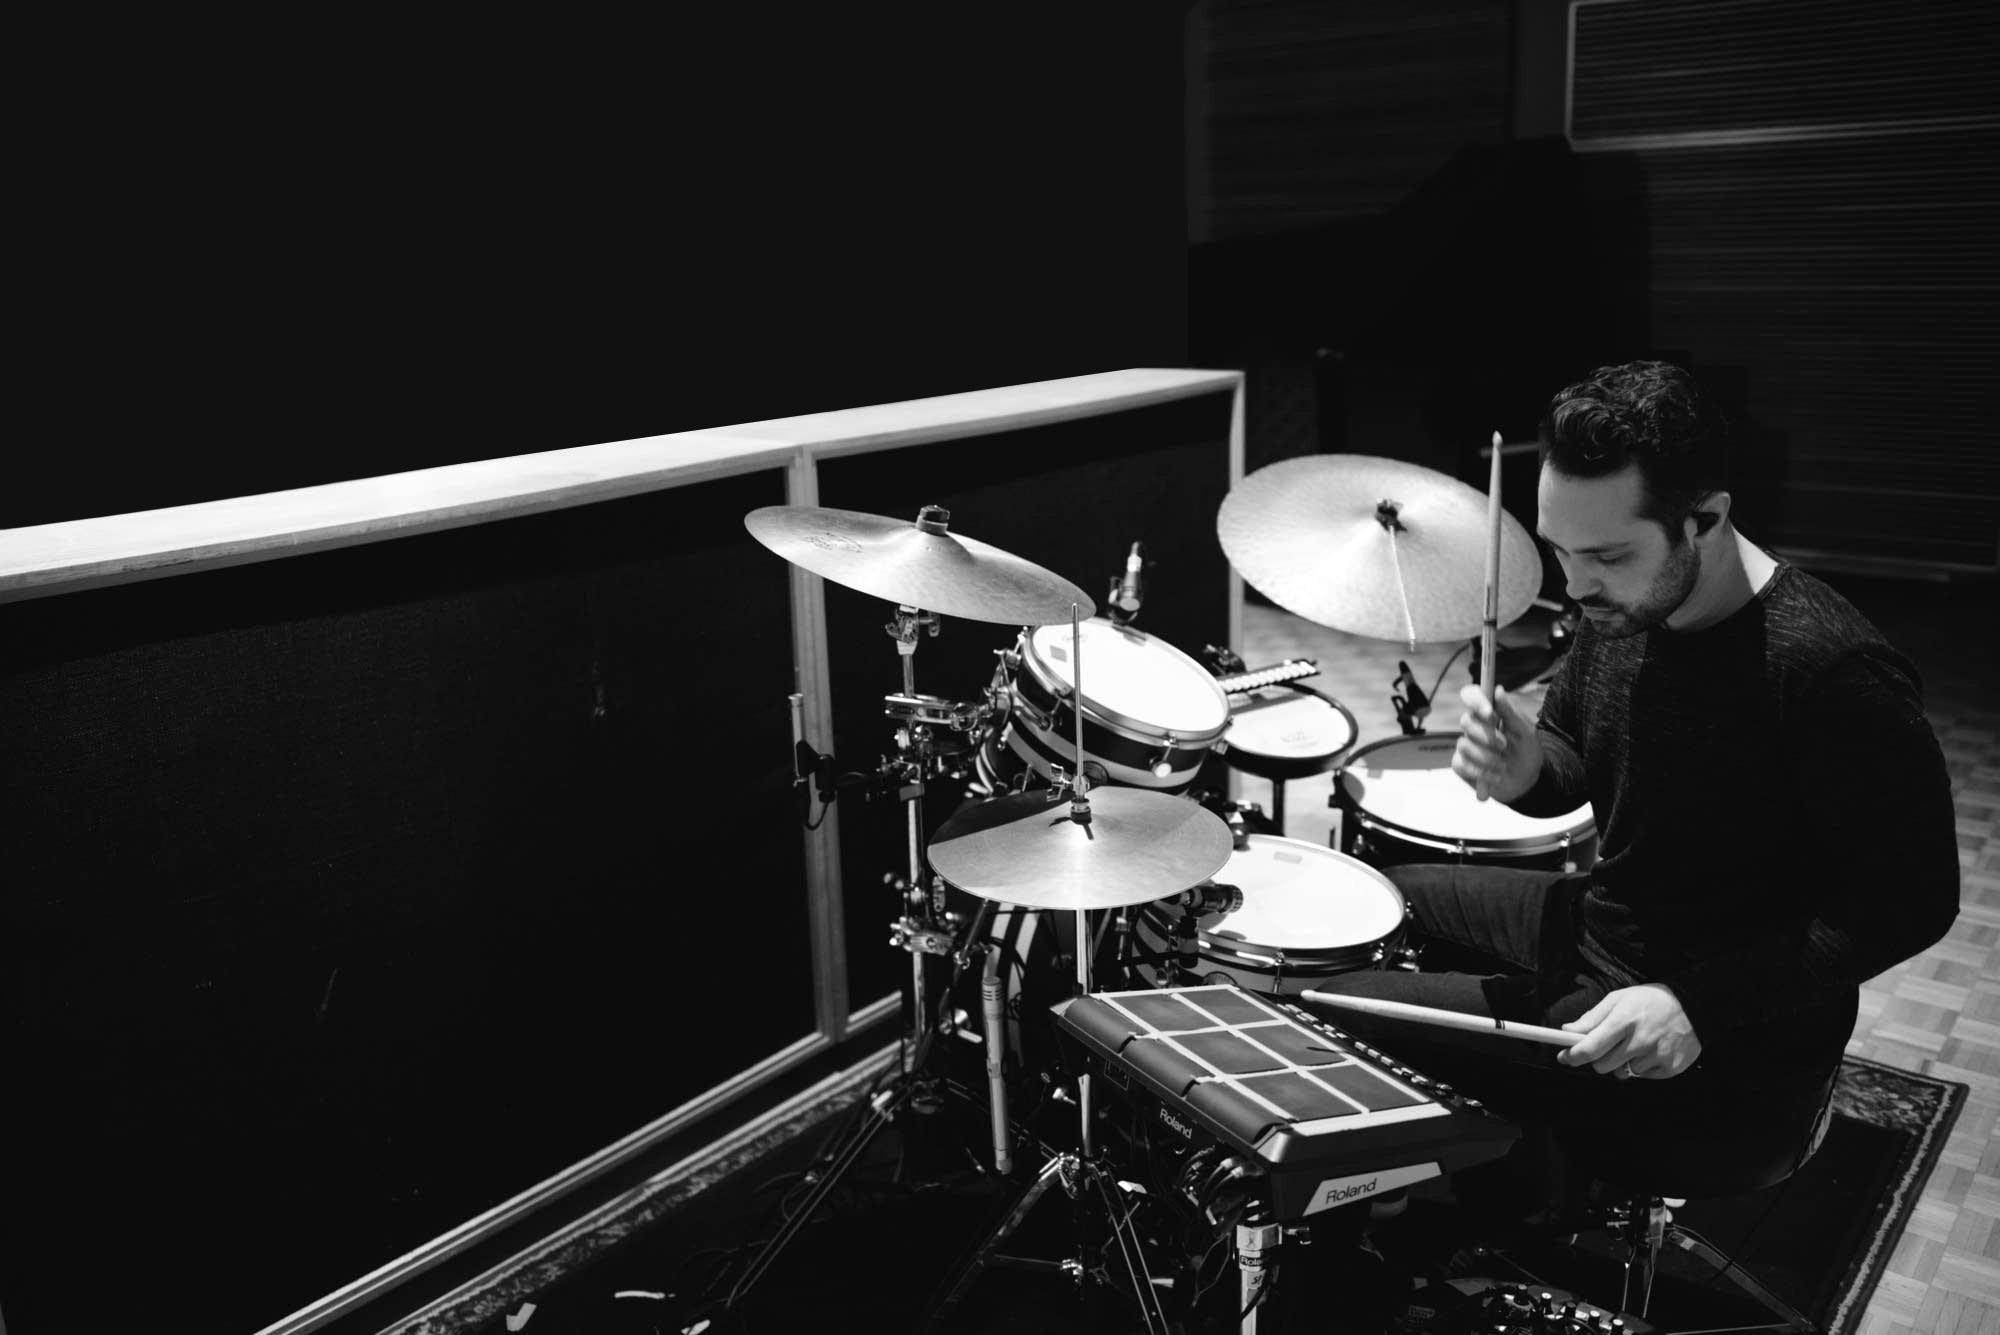
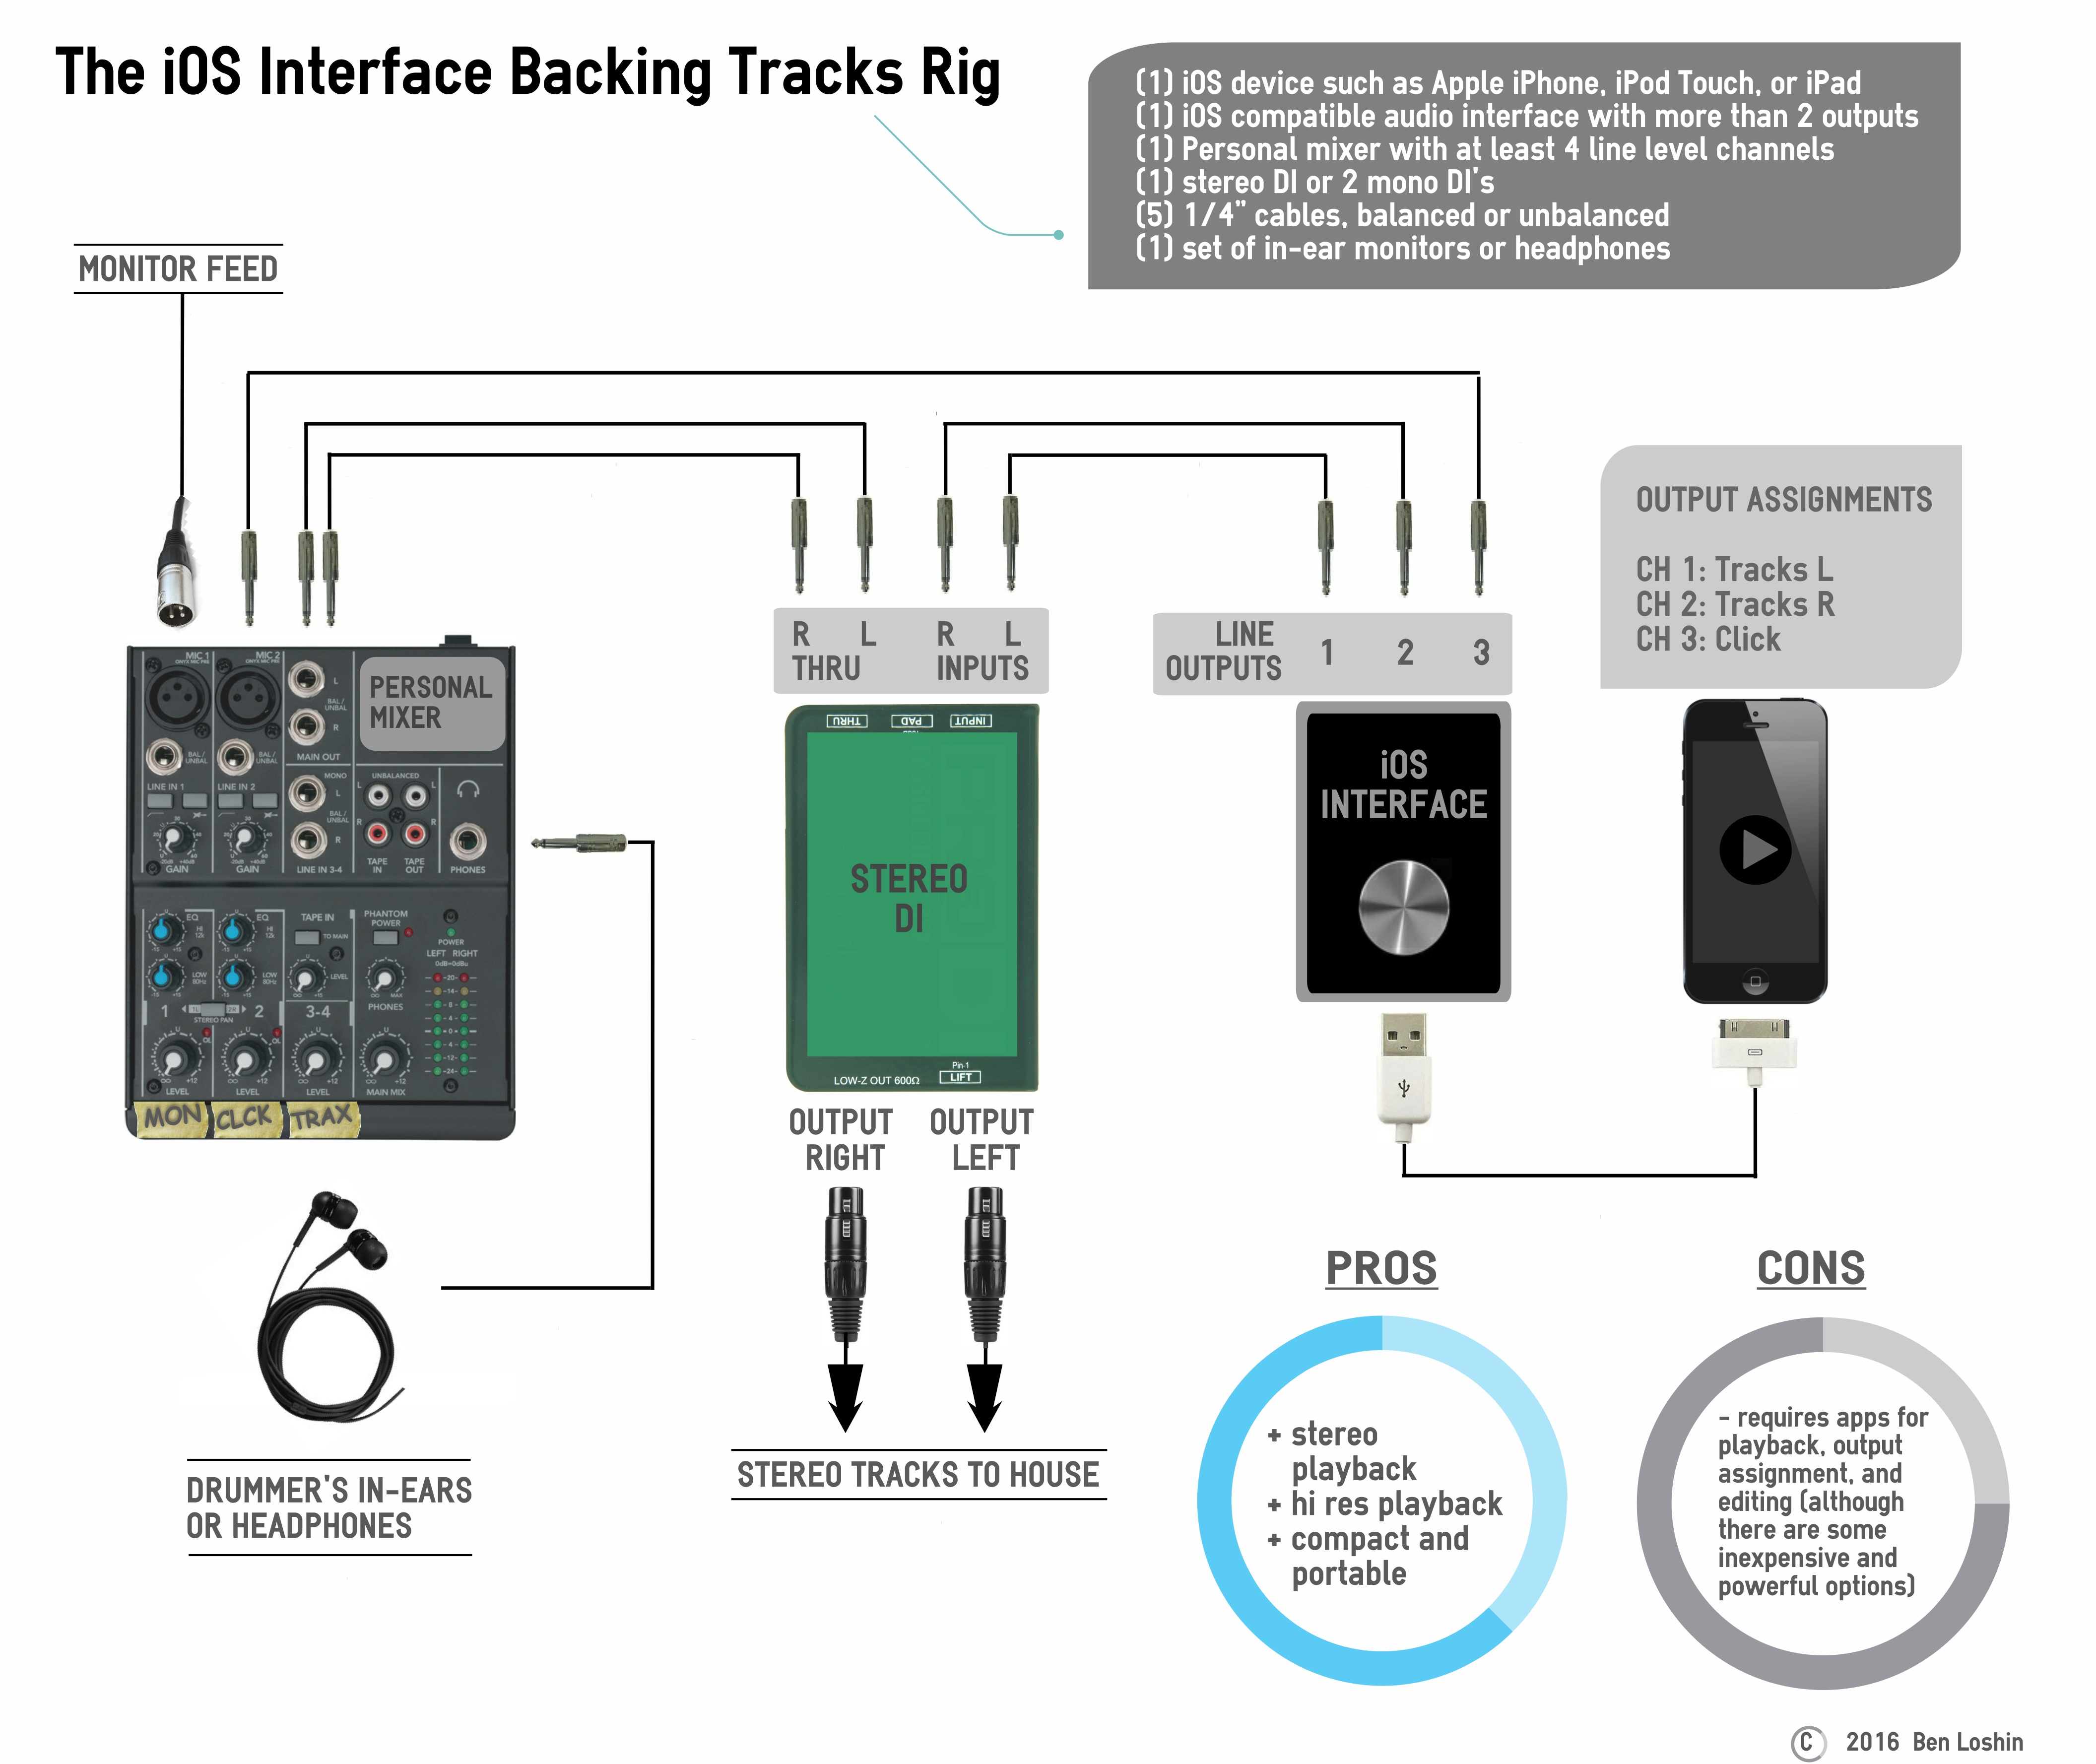
What if you love the idea of running your backing tracks from your iPhone, iPod Touch or iPad, but you need your tracks to play in stereo and sound really good? The headphone jack on your iOS device can be a great option in a pinch, but it only puts out 1 stereo track (or 2 mono tracks if you utilize a splitter). You need an external soundcard, also called a digital-to-audio converter (DAC) or external audio interface. In the past few years lots of companies have introduced audio interfaces for the iOS device to the market. Many of them have 2 outputs, and that’s fine if you want to run mono backing tracks. However, if you need to send a stereo backing track to the house AND a click track to yourself, that puts you at 3 output tracks.

My favorite iOS interface at the moment is the Native Instruments Traktor Audio 2. I love the Traktor because it’s super compact (fits in the palm of your hand) and super affordable ($100 retail). Though it’s geared toward the DJ market, the Traktor does have two independent 1/8” TRS outputs, for an output track count of 4. One limitation to the Traktor is that it has no audio input preamps or analog-to-digital conversion. In other words, you can’t record with it; strictly playback, but for running backing tracks, that’s all we need in order to get the job done. If you want to purchase something you can also use for recording, the Apogee Duet is a great option.

You’ll also need an iOS app that allows you to assign your stereo mix and click to separate outputs. ShowOne by One Zero One Audio is a fantastic app designed specifically for playback of mono or stereo backing tracks and click/cue tracks through separate outputs. At only $8.99 for the full version it also comes with a bunch of really handy features like automatic click track syncing, voice countoffs, and setlist management.


Audio Fidelity: ****

Ease of Setup: ****

Portability: *****

Reliability: ****

Ease of Editing: app dependent
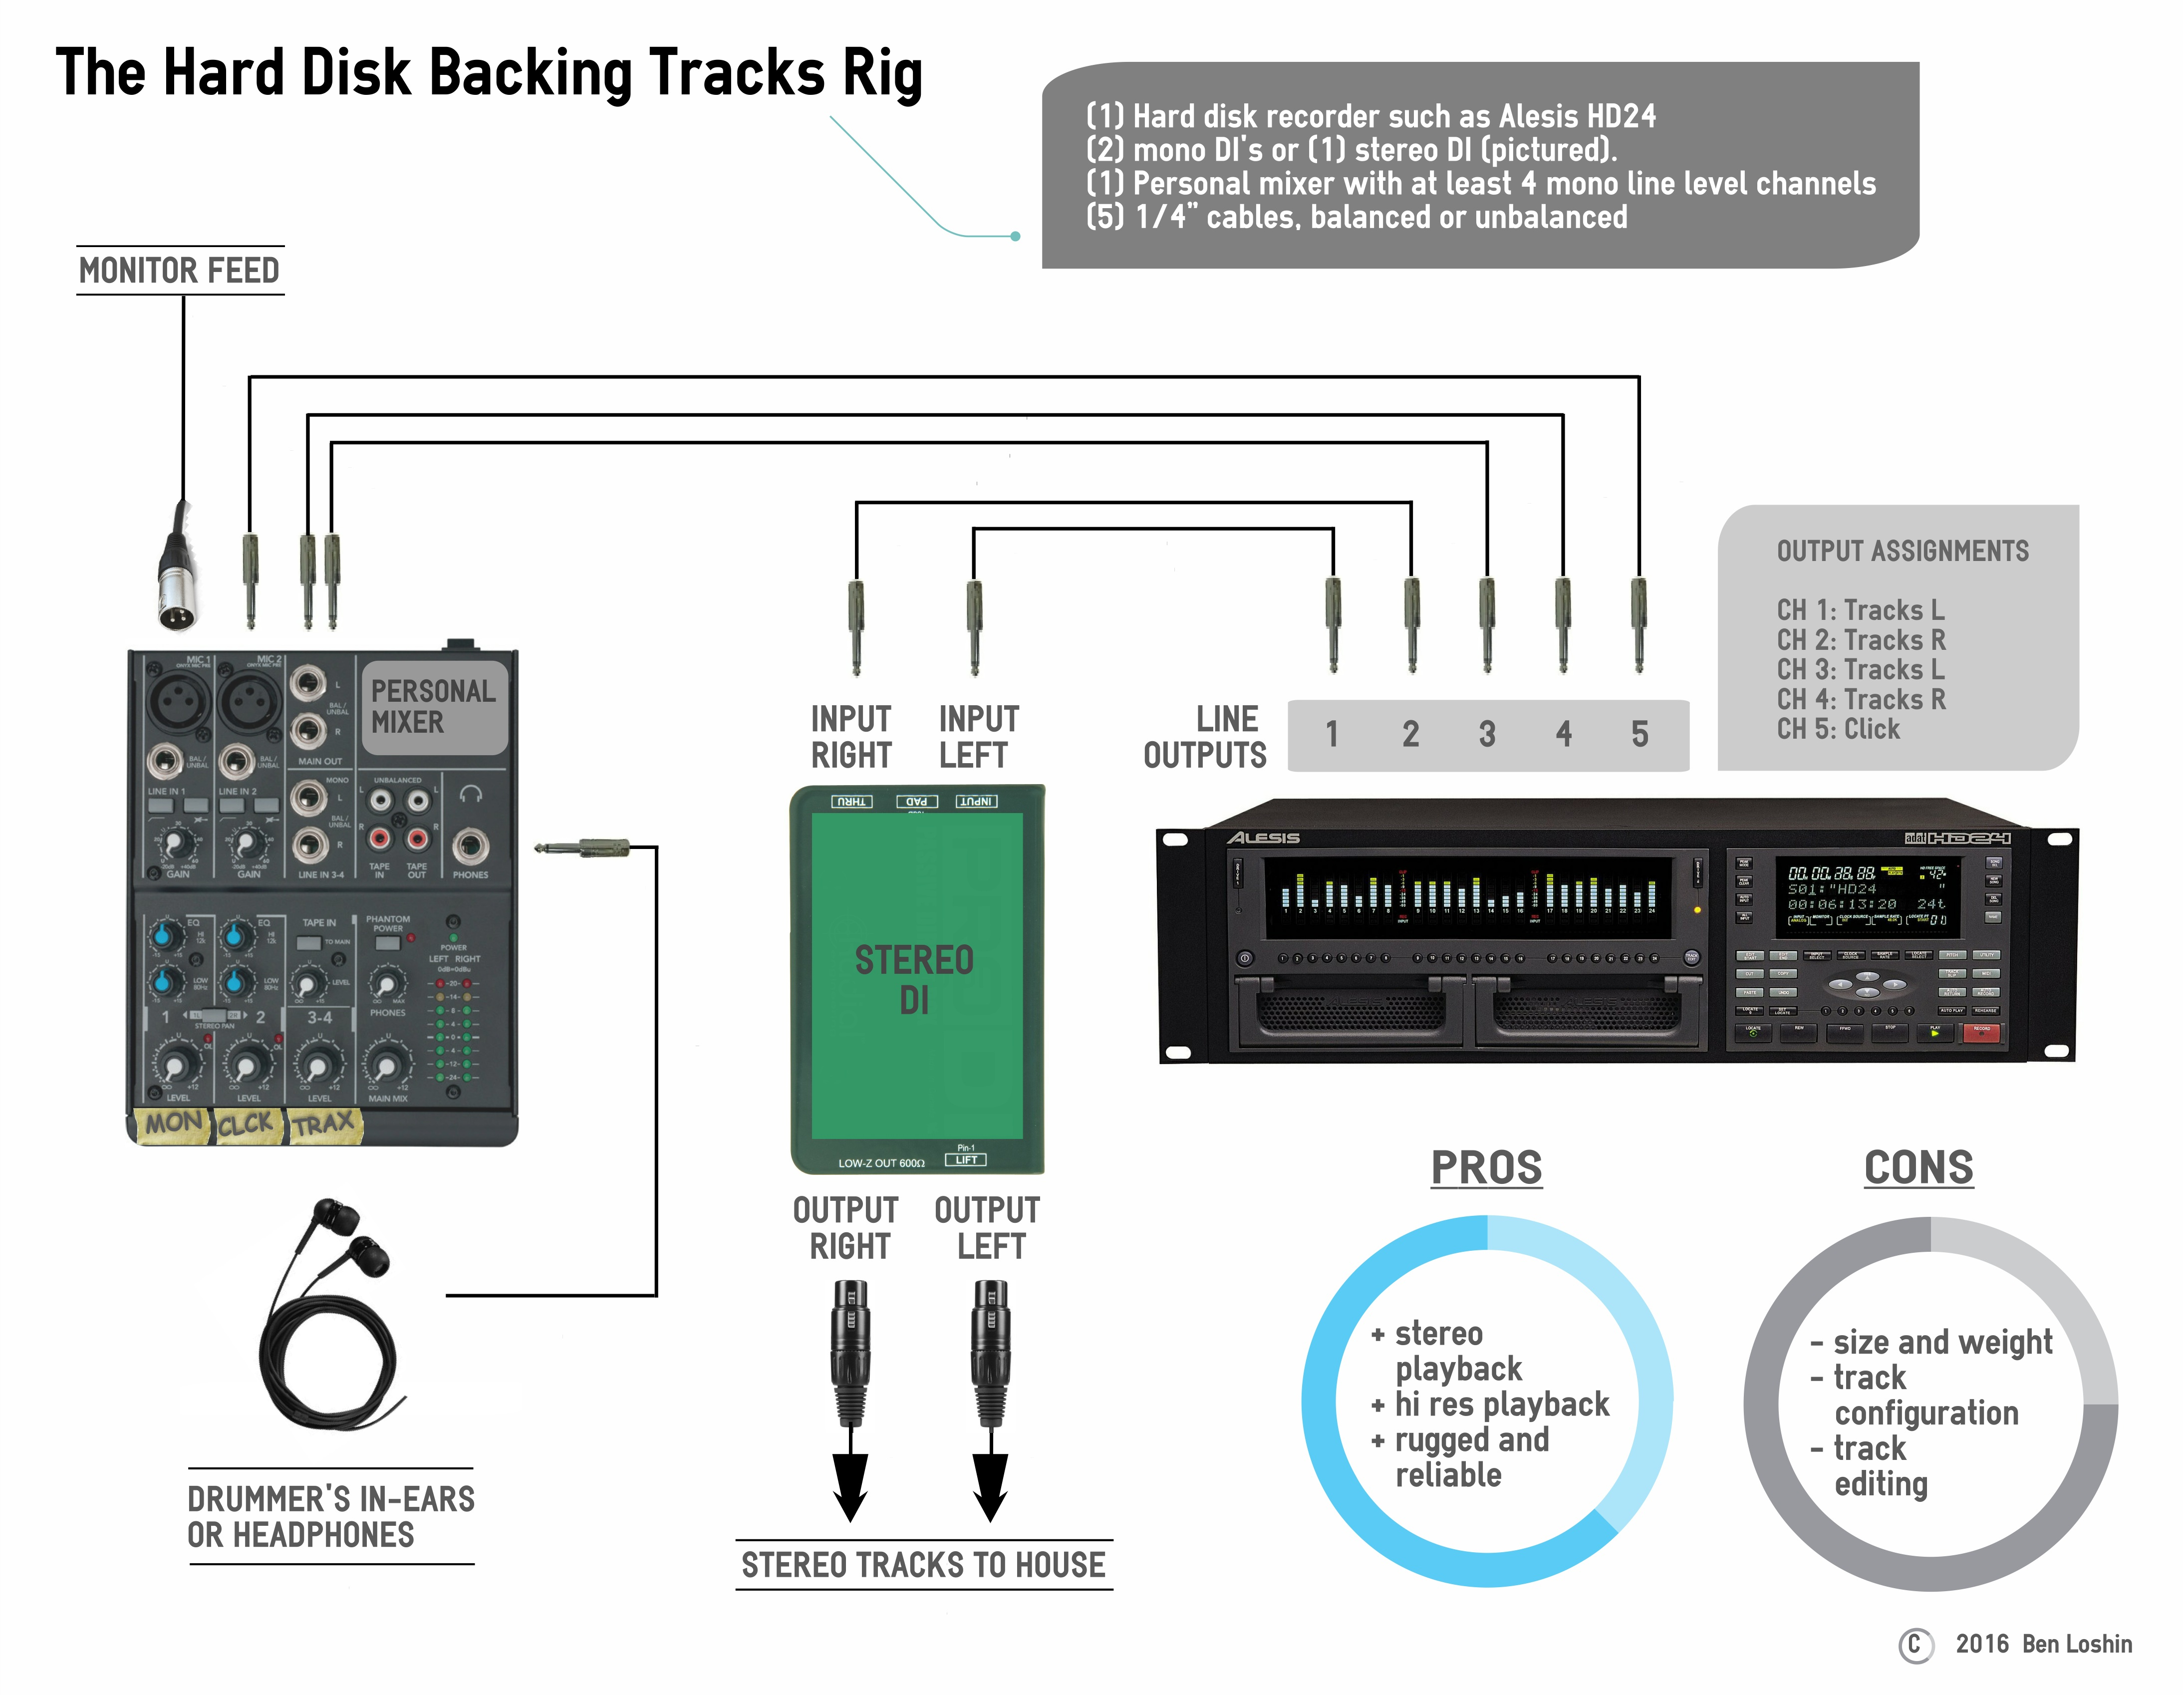
 

Ingredients

  • (1) iOS device such as Apple iPhone, iPod Touch, or iPad
  • (1) iOS compatible audio interface with more than 2 outputs
  • (1) Personal mixer with at least 4 line level channels
  • (1) stereo DI or (2) mono DI’s
  • (5) 1/4” cables, balanced or unbalanced
  • (1) set of in-ear monitors or headphones


Prep

  1. Prepare your backing tracks within your playback app so that you have a stereo mix and a click track routed to individual outputs. Use outputs 1 and 2 for the left and right sides of your stereo backing track and output 3 for click.
  2. Connect your iOS device to your interface. Some interfaces may require adapters from Apple 30-pin to Apple Lightning.
  3. Run a ¼” balanced or unbalanced cable from Output Channel 1 on your interface to the input jack on the stereo DI box labeled “Left”.
  4. Run a ¼” balanced or unbalanced cable from Output Channel 2 to the input jack on the DI box labeled “Right”.
  5. Run a ¼” balanced or unbalanced cable from the left thru port on your stereo DI to the left side of a stereo channel on your mixer labeled “Tracks”.
  6. Run a ¼” balanced or unbalanced cable from the right thru port on your stereo DI to the right side of a stereo channel on your mixer labeled “Tracks”.
  7. Run the ¼” balanced or unbalanced cable from Output Channel 3 on your interface to a channel on your mixer labeled “Click”.
  8. Introduce yourself to the sound guy/gal or monitor engineer and politely ask for a feed to plug into the channel on your mixer labeled “Mon”. Make him/her aware of your DI’s for stereo front-of-house playback.
  9. Connect your in-ear monitors or headphones to the headphone jack on your mixer.


Tips

  • Put your device in airplane mode when using it for playback.
  • If your interface uses TRS outputs to combine pairs of output channels (the Traktor Audio 2 does this), use a stereo “Y” cable to split these channels instead of the two ¼” cables in steps 3 and 4 above.
  • Some interfaces are bus powered, meaning they use your iOS device as a power source, and they will thus drain your iOS device’s battery very quickly.  So make sure you use an external DC power supply to power your interface.

The Hard Disk Backing Tracks Rig

This rig is based around a hard disk recorder like the Alesis HD24 (pictured). With this setup, you have the stereo playback resolution and output options of a computer/high track count audio interface, but without some of the hassles that come with laptop based systems.  However, you have the added step of importing your audio files from your computer into the HD recorder.  You will also need to set up markers in order to indicate the start points of each song.  Although editing and even changing setlist order can be a little cumbersome, the reliability and roadworthyness of a rackmount hardware unit can offer valuable piece-of-mind.

I suggest looking for a used hard disk recorder. Why used? This is 1990’s technology. If you can find one of these new, it will cost over $1,000 and you’re better off with one of the other options at that price point in my opinion.

If you’re new to this world of backing tracks, you can check out this article for a quick overview: Backing Tracks Rigs – An Introduction


Playback: Up to 23 channels (plus click) 24bit 48 kHZ

Audio Fidelity: *****

Ease of Setup: **

Portability: **

Reliability: *****

Ease of Editing: *


Ingredients

  • (1) Hard disk recorder such as Alesis HD24 (pictured).
  • (2) DI boxes or (1) stereo DI (your own). Label them “Left” and “Right”
  • (1) Personal mixer with at least 4 mono line level channels
  • (5) ¼” cables, balanced or unbalanced
  • (1) Headphone extender


Prep

  1. Prepare your backing tracks in your DAW so that you have a stereo mix and a click track.
  2. Import your tracks into the HD24 such that the first two output channels are your stereo backing track, left and right respectively, the third and fourth channels are duplicate outputs of your stereo backing track, and the fifth channel is your click/cue track. You can use the additional output channels if you are sending multiple stems to the house.
  3. Run a ¼” balanced or unbalanced cable from Output Channel 1 to the input jack on the DI box labeled “Left”
  4. Run a ¼” balanced or unbalanced cable from Output Channel 2 to the input jack on the DI box labeled “Right”
  5. Run a ¼” balanced or unbalanced cable from Output Channel 3 to a channel on your mixer labeled “Tracks L”
  6. Run a ¼” balanced or unbalanced cable from Output Channel 4 to a channel on your mixer labeled “Tracks R”
  7. Run the ¼” balanced or unbalanced cable from Output Channel 5 to a channel on your mixer labeled “Click”.
  8. Introduce yourself to the sound guy/gal or monitor engineer and politely ask for a feed to plug into the channel on your mixer labeled “Mon”. Make him/her aware of your DI’s for stereo front-of-house playback.
  9. Connect your in-ear monitors or headphones to the headphone jack on your mixer.


Tips

  • The high output track count on the HD24 and units like it make it possible to create an extra left and right output for your backing tracks that you can use to send to yourself for independent control of the track level in your own in-ears.  This will allow you to ride the level of the tracks in your mix without affecting the level going to the house.
  • If anyone else in the band needs to hear click/cues, you can use one of the available outputs to duplicate that track and send it to that player or to the monitor engineer.
  • The HD24 is a 3-space rackmountable unit. You can house it in a soft rack case such as the Gator GRB 4U, with the mixer and DI’s on top. To decrease setup time, bundle the three cables that connect the HD24 to your mixer using cable ties, and bundle the two cables that connect the HD24 to your DI’s. Label the ends of each cable.
  • To be extra slick, you can get a rackmountable mixer, a rackmountable DI, and a rackmountable power supply, and house everything in one rack. This option could work for van and bus tours and church installations, but will likely be too big and heavy to fly.

Jingle Ball with Conrad Sewell

I’m looking forward to drumming for Conrad Sewell at the iHeart Radio Jingle Ball on these dates.

Dec 3. Oracle Arena, Oakland
Dec 4. Staples Center, Los Angeles
Dec. 8. Columbus, Ohio
Dec. 9. Wells Fargo Center, Philadelphia
Dec. 11. Madison Square Garden, New York
Dec. 12. Poughkeepsie, New York
Dec. 16. Rosemont, Illinois
Dec. 18. BBT Center, Sunrise, Florida
Dec. 19. Amalie Arena, Tampa, Florida

Playing this beautiful walnut kit from DDrum.

Conrad Ddrum

Fall Update, Australia, New Zealand

I happy to share I’ve been busy working for the very talented Australian pop star, Conrad Sewell.  We just finished two sold out headlining tours of Australia and New Zealand and a handful of dates opening for Maroon 5.  Conrad also ended up winning the Aria Award for Song of the Year for his song, “Start Again”.

I learned Australia has some damn fine coffee.  Good food too.

Here’s a snap from our last show. Metro Theater in Sydney.  November 25.

Conrad Metro


SXSW 2015

I had a great time at South By Southwest with Conrad Sewell.  We played the Spotify House, the 300 Entertainment Showcase, and even fit in a trip to the legendary Franklin Barbecue.  I’m still full!

Conrad recently released a pair of singles, “Hold Me Up” which has climbed to #2 on the Spotify Global Viral charts and “Start Again” which he performed on the NBC Today Show last Wednesday.


IMG_0471

IMG_0438

Motown Practice Loop

I like making my own playalongs for practicing drums.  I’ve always loved the groove in Marvin Gaye’s “What’s Goin On”, so I sampled this loop from a 2 1/2 minute vamp during a live performance of the song from I think 1971.  The band seems to be made up of members of The Funk Brothers, the same Detroit session players who recorded the original track.  One of those guys is Eddie “Bongo” Brown’s, Motown’s conga player.  The congas were on the left side of the stereo field, so I took the left side, bussed it to a mono track, and added some EQ and compression to bring out the subdivisions in the congas.

I like playing drums over this loop because Eddie’s a badass, his playing is a big part of the Motown rhythmic feel, and there’s no drumset to play over.  As you play along. you can try to replicate the original drum part, create your own grooves over it, or just use it as a sort of metronome.  I like practicing rudiments and coordination exercises over loops like this that have some human subdivisions and a lot of feeling.  In fact, ditch your click for a while!  If you can play your Stick Control and Syncopation stuff inside Eddie’s pocket, you’re well on your way to becoming a more musical drummer.

Full performance here: http://youtu.be/9QK5W4LxTG0

From AllMusic.com:

“As a member of the legendary Funk Brothers, Eddie “Bongo” Brown was the primary studio percussionist during the heyday of Motown Records, serving as a crucial element of some of the most enduring and transcendent soul music ever produced. Born in Clarksdale, MS, in 1932, Brown was raised in Memphis, learning to play virtually every hand-held percussion instrument but particularly excelling on the bongos and congas. After relocating to Detroit, he worked the local nightclub circuit before joining the fledgling Motown label in 1962, infusing the nascent Motown sound with elements of Latin rhythms. Funk Brothers bandleader Earl Van Dyke once estimated Brown played on “at least 97 percent of all the music that came out of Motown.

Remarkably, he couldn’t even read music — in the Funk Brothers documentary Standing in the Shadows of Motown, keyboardist Joe Hunter claimed that during sessions, Brown simply replaced his sheet music with nudie magazines. As Motown’s focus shifted from producer-driven singles to artist-driven LPs, Brown left his indelible mark on classics like Marvin Gaye’s Let’s Get It On and Stevie Wonder’s Songs in the Key of Life. When owner Berry Gordy Jr. relocated the label from Detroit to Los Angeles, Brown followed, in subsequent years touring with Gaye and Liza Minnelli. He died from a heart ailment on December 28, 1984, at the age of just 52.”


Forty Below Records Free Sampler On Noisetrade

The team at Forty Below Records just put out a compilation of recent releases from the label, as well as a few other terrific Eric Corne productions.  It’s available on Noisetrade as a free download.

Forty Below Records & Friends, Volume I features tracks from blues legends John Mayall and Walter Trout, Americana veterans Tim Easton and Anne McCue, emerging artists KaiL Baxley, Sam Morrow and Bonson Berner, and other friends and frequent collaborators of Forty Below founder Eric Corne, including Joanna Wang. A star in her native Taiwan, yet still unreleased in North America, this adventurous songwriter pushes the boundaries with an American supergroup as her backing band.


Update – Sessions, Forty Below Records, and Conrad

Hello and Happy New Year!  I’m happy to report I’ve been busy drumming in the studio for a handful of country and roots artists, including Amy Loftus, Ricky Johnson, KaiL Baxley, Seneca And The River, and Samantha Valdez.

Working with Eric Corne and Forty Below Records on a bunch of new releases for 2015.  Check out what’s going on at Forty Below!

I’m also getting ready for some live dates with a great Australian singer/songwriter named Conrad, whose collaboration with Kygo, called “Firestone”, just went to #1 on iTunes and Spotify Norway.  Go Conrad.

Can’t wait to see what 2015 brings.

All About Groove – How To Practice Backbeat Placement

(Demo videos coming soon! ….)

First thing to realize is your groove will never sound exacly like Keltner’s or JR’s or anyone else’s. That’s what’s beautiful about playing an instrument. I feel it’s ok to imitate your heros if it helps you learn a new skill. Eventually, with enough practice, you’ll internalize this feel and be able to access it automatically when your musical intuition tells you to go there.

But first you need to paint the fence, wash the car, do whatever else Mr. Miyagi tells you to do. It will make sense later. You need to train your body to be comfortable with it and with enough practice you’ll notice the subtle seasoning in your playing, and so will others.

Before you start, record yourself playing a simple “Billy Jean” type groove with 1 and 3 on the kick and 2 and 4 on the snare with an 8th note hi hat to a click. Don’t try to lay anything back, just aim for the middle of the beat. Record 8 bars or so of this. You’ll use this as a baseline to mark your progress.

To help you get cozy with a late backbeat I’m going to use a familiar rudiment, the flam. Your goal is to be able to control just how late your backbeat lands and keep it from shifting.

  1. Grab your practice pad and a metronome. For right handed drummers, play left hand accent flams on 2 and 4, resting on the other beats. The practice pad will help you hear the click better. Find a volume for your metronome such that your left hand accent is about the same volume as the click. This is crucial. Make the grace note land on the beat and the accent follow it. Play around with the tightness of the flam. Start with a unison flam (both hands hit the pad at the same time) and gradually open it until the accent is all the way to the &, then gradually move back to a unison flam. Do this over the course of 16 bars or so. Find a slow tempo that’s comfortable.  Use an 8th note click if it helps you stay in time. Be careful not to let the grace note shift from the click.
  1. When you’re ready add ¼ notes on your right hand on 1 and 3. Keep them low like your flam grace note. You want to be able to clearly hear the relationship between the click and the left hand accent. You now have a quarter note groove emerging with a backbeat on 2 and 4. Again, vary the tightness of the flam all the way to the & and back over 16 bars.
  1. Now go to 8th notes with the right hand. Notice that when you start the 16 bar phrase, you have a unison flam on 2 & 4. Around bar 8 when your left hand accent reaches the & you’ll have a unison flam on the & of 2 and the & of 4.
  1. Once you’re comfortable with the above exercises, pick a flam tightness that feels good and try some different tempos, keeping the flam tightness consistent. Listen to how the accent lands just after the click on 2 and 4. Get comfortable with this. Be careful not to let your right hand get behind the beat.
  1. When you’re feeling good on the pad, move to the kit. Do the above exercises with your right hand on the hi hat and left hand on the snare.
  1. Now, with the click running, stop playing the hi hat. Just play the snare with your left hand. Notice how you can consistently play your snare just behind the click. See how long you can hold it there. When you get off, put your right hand back in to help guide you.
  1. Here’s the thing, this flam business is just an exercise to get you cozy with the late backbeat. You don’t really want any flaming between your hi hat and snare in your groove. Experiment with shifting your right hand a little later on beats 2 and 4 so that it lands in unison with your left hand. You’re effectively stretching beats 1 and 3 slightly longer than a ¼ note and shortening beats 2 and 4 to slightly under a ¼ note to catch up to the next downbeat.
  1. Record yourself performing Step 8 and compare with your initial recording. Do you hear a difference in your pocket?

All About Groove – 6 Drummers That Inspired Me To Work On My Beat Placement

groove

In my last post, I posed the question, what is groove? Now that we’ve identified the key ingredients in a great groove, I want to explore one of these ingredients in more depth – beat placement. On a few occasions, I’ve had people ask me, “Hey can you lay that backbeat back a little?”  To which I thought, well…I don’t know.  Just the backbeat?  And leave everything else on the beat?  Sure, on a good day I can play ahead, on the beat, or behind if I want, but I’ve never tried doing more than one at once.  And how the heck would I practice that?  That sounds hard.

This comment changed how I think about Groove.  Up until then, I’d always practiced with the goal of burying the click on every quarter note, making sure my quarter notes were quarter notes and my eighth notes were eighth notes and every kick and snare note lined up with my hi hat, like I’d been taught.  I never realized different voices in the kit could be on top, on the beat, or behind relative to other voices in the kit in the same groove.  I started listening to some of my heros, and I found this common thread in their grooves.  In many cases, there was indeed a slight anticipation before the backbeat!

I tried it.  I was hard.  And then, a breakthrough happened.

But. before we get into how, let’s explore who, what, why, and where.  I made a Spotify playlist with some examples of tracks where the drummer is laying the backbeat back and some comments on the drummers that popularized this feel.

Jim Keltner

groove

I was recording with some people recently, and the topic came up of keeping the bass drum right on the beat and the snare behind the beat.  The producer told me people used to call this feel “California Swing” because of Keltner’s use of it on so many LA sessions that it became associated with the California sound during the 70’s and 80’s.  If you’re looking to study Keltner’s drumming, Sergej Randelovic-Runjo’s Jim Keltner Discography is an excellent resource.  For now, check out “Fool Who Knows” by Little Village, “Knocking on Heaven’s Door” by Bob Dylan, and “Shangri-La” by Don Henley.


Steve Ferrone

Groove

I love Steve Ferrone’s playing with Tom Petty, especially on the Wildflowers album.  “Honey Bee” is probably the most drastic example of the late backbeat on the playlist, so it’s a good example to start with to identify what I’m talking about.


John Robinson

groove

JR’s groove on Steve Winwood’s “Take It As It Comes” is great example of his unique lope.  When I listen to JR, I can’t help but picture an egg rolling end-over-end.  It’s asymmetrical, yet so consistent it becomes hypnotic.  Could this be why he played on so many dance tracks in the 80’s?  (Side note, isn’t in amazing that real human drummers used to play on dance tracks?  Human people like James Gadson, Tony Thompson, and JR.)

Speaking of James Gadson…


James Gadson

groove

A master of the 16th note hi hat groove, Gadson set the bar for R&B drumming in the 60’s and 70’s.  Listen to the beat placement on Bill Withers’ “Use Me”, but also check out the pocket on “If You Think You’re Lonely Now”, which was a hit in 1981 off Bobby Womack’s album The Poet.


Jeff Porcaro

jeffporcaro765

A busy LA session player from the mid 70’s to early 90’s who died young, Jeff Porcaro left behind a massive legacy of groove.  One aspect of Jeff’s playing I love is his ability to put the backbeat in exactly the right place for the song.  My favorite example is “Luck Of The Draw”, the title track off Bonnie Raitt’s 1991 album.  Jeff is 100% inside the song.  Also check out Springsteen’s “Human Touch” and Toto’s “Without Your Love”.


All songs mentioned:


Now on to the business of HOW TO PRACTICE THIS FEEL