Practice Technique Inspired by Mark Guiliana

I was surfing YouTube for some practice inspiration and came across Nate Smith’s videos. Nate, who goes by The 80/20 Drummer, has loads of great videos where he analyzes other drummers and sort of dissects unique aspects of their playing that us drummers can put to use in our practice. That’s exactly what he does in the video below on Mark Guiliana and, specifically, Mark’s approach to practicing metric modulation. Mark is one of my favorite drummers, and I think a big piece of Mark’s originality comes from his phrasing as he moves between different time feels and subdivisions.

To sum up Nate’s exercise, you take a bar of ¾ time and subdivide it with 16th notes so that you have 12 16th notes per bar. From that bar of 12 16th notes you can derive different time feels or pulses just by grouping those 16th notes into groups of 6, groups of 4, and groups of 3. Groups of 6 feels like 2 pulses per bar; groups of 4 feels like 3 pulses per bar; and groups of 3 feels like 4 pulses per bar. If that explanation gives you nightmare flashbacks of middle school math, just watch Nate’s demonstration. If you prefer to think about it in terms of actual note values, groups of 6 are dotted quarter notes, groups of 4 are quarter notes, and groups of 3 are dotted eighth notes.  The point is, these different groupings give the illusion of a pulse that speeds up and slows down, but the underlying time is constant.

Nate’s exercise is a 4-bar phrase in ¾ time, with each bar divided into groups of 6, groups of 4, groups of 3, then back to groups of 4. You can play a simple pattern on the kick/snare/hihat at the speed of each grouping pulse. The challenge comes when switching between grouping pulses. When I tried practicing this, I found it difficult at first to feel the pulses without counting. So I used Ableton Live to program some loops to help me out.

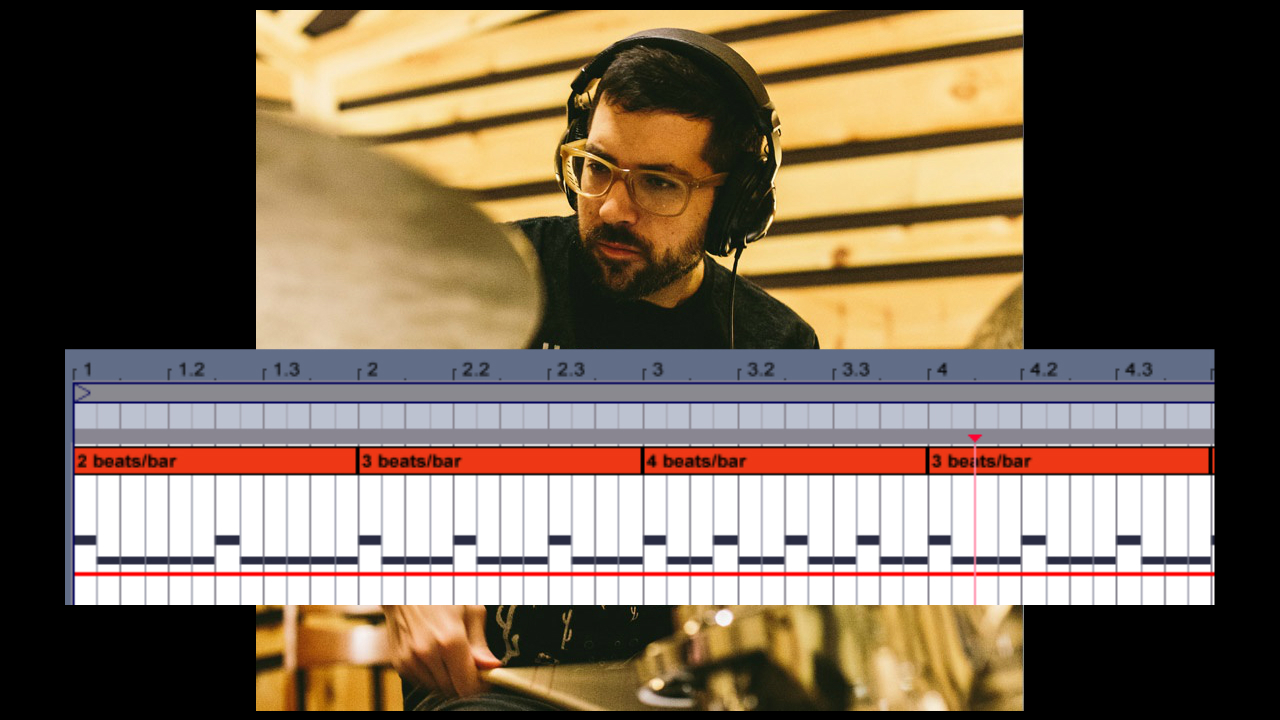
The first metronome in the playlist below is a 2-minute loop of Nate’s 4-bar phrase, with accented notes defining the pulse groupings and unaccented 16th notes in between. The graphic is what it looks like programmed in Ableton. Each vertical line is a 16th note. The second metronome is a 2-minute loop of the 4-bar phrase, with only the accented notes. I made versions of both metronomes at 90 and 130 BPM which is why there are 4 videos in the playlist.

These two metronomes are like training wheels. Use them to gauge where you’re pulling ahead and where you’re lagging behind as you transition between pulses. Ideally, after a little practice you’ll be able to feel the pulses internally. I think it’s a good idea to start with the first metronome. Then, when you’re comfortable with that at both tempos try the second. Then, you can transition to a basic 16th note metronome like the one Nate uses, eventually improvising in each pulse grouping for extended periods.

Anyway, props to Nate for coming up with this methodical approach to understanding this aspect of Mark Guiliana’s playing! Check out the 80/20 Drummer YouTube channel for more great stuff.

(And listen to Mark Guiliana)

Motown Practice Loop

I like making my own playalongs for practicing drums.  I’ve always loved the groove in Marvin Gaye’s “What’s Goin On”, so I sampled this loop from a 2 1/2 minute vamp during a live performance of the song from I think 1971.  The band seems to be made up of members of The Funk Brothers, the same Detroit session players who recorded the original track.  One of those guys is Eddie “Bongo” Brown’s, Motown’s conga player.  The congas were on the left side of the stereo field, so I took the left side, bussed it to a mono track, and added some EQ and compression to bring out the subdivisions in the congas.

I like playing drums over this loop because Eddie’s a badass, his playing is a big part of the Motown rhythmic feel, and there’s no drumset to play over.  As you play along. you can try to replicate the original drum part, create your own grooves over it, or just use it as a sort of metronome.  I like practicing rudiments and coordination exercises over loops like this that have some human subdivisions and a lot of feeling.  In fact, ditch your click for a while!  If you can play your Stick Control and Syncopation stuff inside Eddie’s pocket, you’re well on your way to becoming a more musical drummer.

Full performance here: http://youtu.be/9QK5W4LxTG0

From AllMusic.com:

“As a member of the legendary Funk Brothers, Eddie “Bongo” Brown was the primary studio percussionist during the heyday of Motown Records, serving as a crucial element of some of the most enduring and transcendent soul music ever produced. Born in Clarksdale, MS, in 1932, Brown was raised in Memphis, learning to play virtually every hand-held percussion instrument but particularly excelling on the bongos and congas. After relocating to Detroit, he worked the local nightclub circuit before joining the fledgling Motown label in 1962, infusing the nascent Motown sound with elements of Latin rhythms. Funk Brothers bandleader Earl Van Dyke once estimated Brown played on “at least 97 percent of all the music that came out of Motown.

Remarkably, he couldn’t even read music — in the Funk Brothers documentary Standing in the Shadows of Motown, keyboardist Joe Hunter claimed that during sessions, Brown simply replaced his sheet music with nudie magazines. As Motown’s focus shifted from producer-driven singles to artist-driven LPs, Brown left his indelible mark on classics like Marvin Gaye’s Let’s Get It On and Stevie Wonder’s Songs in the Key of Life. When owner Berry Gordy Jr. relocated the label from Detroit to Los Angeles, Brown followed, in subsequent years touring with Gaye and Liza Minnelli. He died from a heart ailment on December 28, 1984, at the age of just 52.”


All About Groove – How To Practice Backbeat Placement

(Demo videos coming soon! ….)

First thing to realize is your groove will never sound exacly like Keltner’s or JR’s or anyone else’s. That’s what’s beautiful about playing an instrument. I feel it’s ok to imitate your heros if it helps you learn a new skill. Eventually, with enough practice, you’ll internalize this feel and be able to access it automatically when your musical intuition tells you to go there.

But first you need to paint the fence, wash the car, do whatever else Mr. Miyagi tells you to do. It will make sense later. You need to train your body to be comfortable with it and with enough practice you’ll notice the subtle seasoning in your playing, and so will others.

Before you start, record yourself playing a simple “Billy Jean” type groove with 1 and 3 on the kick and 2 and 4 on the snare with an 8th note hi hat to a click. Don’t try to lay anything back, just aim for the middle of the beat. Record 8 bars or so of this. You’ll use this as a baseline to mark your progress.

To help you get cozy with a late backbeat I’m going to use a familiar rudiment, the flam. Your goal is to be able to control just how late your backbeat lands and keep it from shifting.

  1. Grab your practice pad and a metronome. For right handed drummers, play left hand accent flams on 2 and 4, resting on the other beats. The practice pad will help you hear the click better. Find a volume for your metronome such that your left hand accent is about the same volume as the click. This is crucial. Make the grace note land on the beat and the accent follow it. Play around with the tightness of the flam. Start with a unison flam (both hands hit the pad at the same time) and gradually open it until the accent is all the way to the &, then gradually move back to a unison flam. Do this over the course of 16 bars or so. Find a slow tempo that’s comfortable.  Use an 8th note click if it helps you stay in time. Be careful not to let the grace note shift from the click.
  1. When you’re ready add ¼ notes on your right hand on 1 and 3. Keep them low like your flam grace note. You want to be able to clearly hear the relationship between the click and the left hand accent. You now have a quarter note groove emerging with a backbeat on 2 and 4. Again, vary the tightness of the flam all the way to the & and back over 16 bars.
  1. Now go to 8th notes with the right hand. Notice that when you start the 16 bar phrase, you have a unison flam on 2 & 4. Around bar 8 when your left hand accent reaches the & you’ll have a unison flam on the & of 2 and the & of 4.
  1. Once you’re comfortable with the above exercises, pick a flam tightness that feels good and try some different tempos, keeping the flam tightness consistent. Listen to how the accent lands just after the click on 2 and 4. Get comfortable with this. Be careful not to let your right hand get behind the beat.
  1. When you’re feeling good on the pad, move to the kit. Do the above exercises with your right hand on the hi hat and left hand on the snare.
  1. Now, with the click running, stop playing the hi hat. Just play the snare with your left hand. Notice how you can consistently play your snare just behind the click. See how long you can hold it there. When you get off, put your right hand back in to help guide you.
  1. Here’s the thing, this flam business is just an exercise to get you cozy with the late backbeat. You don’t really want any flaming between your hi hat and snare in your groove. Experiment with shifting your right hand a little later on beats 2 and 4 so that it lands in unison with your left hand. You’re effectively stretching beats 1 and 3 slightly longer than a ¼ note and shortening beats 2 and 4 to slightly under a ¼ note to catch up to the next downbeat.
  1. Record yourself performing Step 8 and compare with your initial recording. Do you hear a difference in your pocket?